
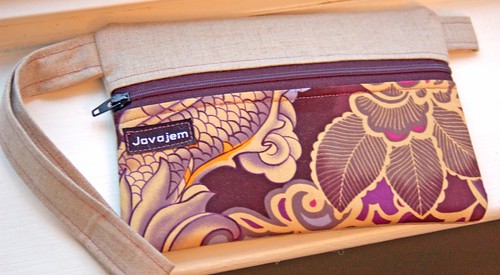
This time it's for my Wristlet pattern.
Remember these?
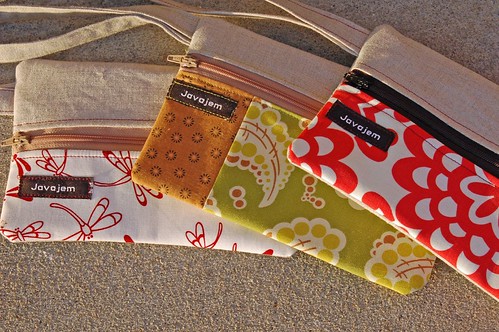
Well, now you can make one too!
Materials:
- Less than a quarter yard of linen,
- Scraps of quilting cotton in two patterns (one for the lining and one for the outside accent fabric)
- Less than a quarter yard of medium weight fusible interfacing
- Thread to match
- Cutting mat, ruler and rotary cutter
- Zipper (7 inches or larger)
- Pins and other sewing tools
Directions:
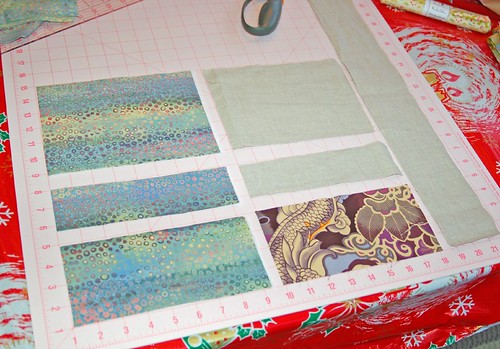
Step 1: Select and cut your fabric. I used linen for the body and strap, but you could use anything. Cut out the pieces:
-From the linen:
- Cut 2 pieces that measure 8'' by 6''
- Cut a piece for the strap that measures 22'' by 3.5''
- Cut 1 piece of cotton fabric for your outside accent piece that measures 8'' by 6''
- Cut 2 pieces of Cotton fabric for the inside lining that measure 8'' by 6''
- Cut 2 pieces of interfacing that measure 8'' by 6''
Step 2: Iron the interfacing to the inside lining pieces.
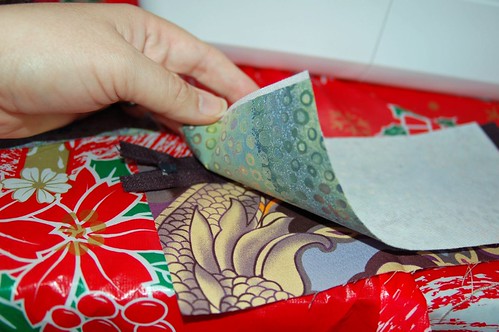
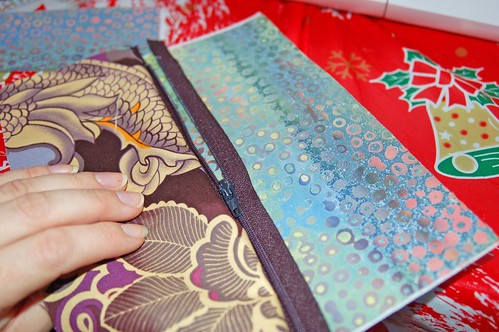
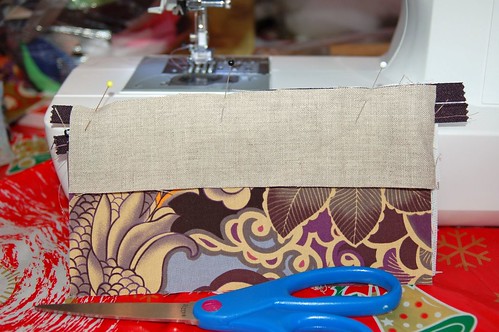
Step 3: Cut one of the inside lining pieces, the outside accent fabric and one of the linen pieces to create the opening for the zipper. Determine where you want the zipper to go - it can be anywhere. I cut my pieces 2'' from the top. (Leave at least an inch and a half on top for the seam and handle)
After cutting your pieces - your fabric should look like this:
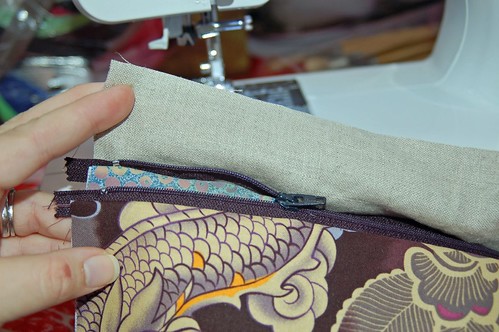
Step 4: Pin fabrics to zipper.
Starting with the pieces that will end up below the zipper, pin the inside lining and outside accent fabric pieces to zipper. Make sure to put the outside accent fabric "right side to right side" with the zipper. (The front of the zipper should go against the right side of your outside accent fabric and the back of the zipper should be up against the right side of the inside fabric.)
You are basically making a sandwich with the zipper on the inside:
Like this:
Pin in place, making sure to only pin through the top half of the zipper - otherwise it will make it harder to open and close the zipper if you pin through both sides (more on this later).
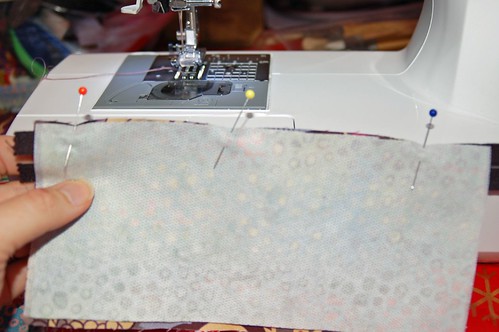
After pinning the fabric to the zipper, open the zipper about halfway before you start sewing.
Tip: The reason I open the zipper before I start to sew, is because if you leave the zipper closed, it is harder to sew next to the zipper pull. You will close the zipper after sewing halfway across.
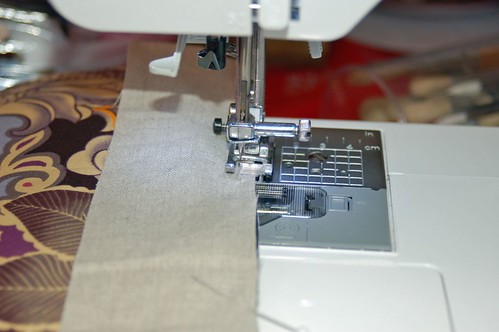
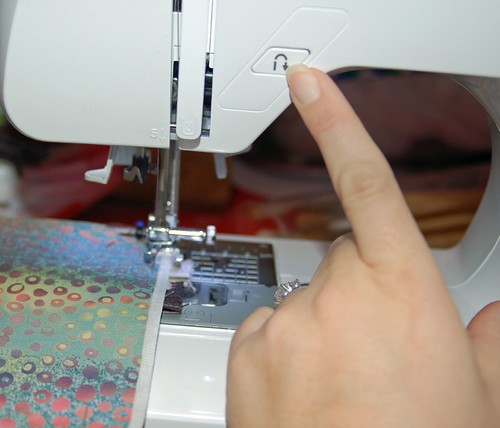
Step 5: Start to sew the zipper to the bottom inside and outside fabrics. Use a zipper foot, or about a quarter inch seam allowance. Stop before you get to the zipper pull.
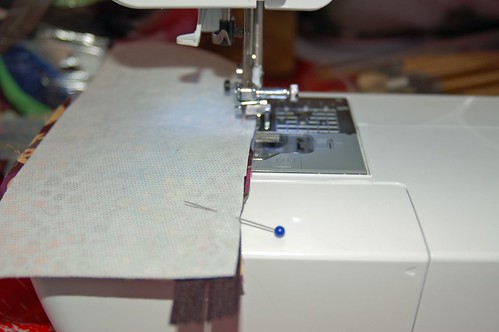
When you reach the zipper pull, make sure your needle is in the down position (in the fabric) and then raise the pressure foot. Turn your work so you can see where you are, and close the zipper. Now the zipper pull won't be in your way anymore, and you finish sewing across the piece.
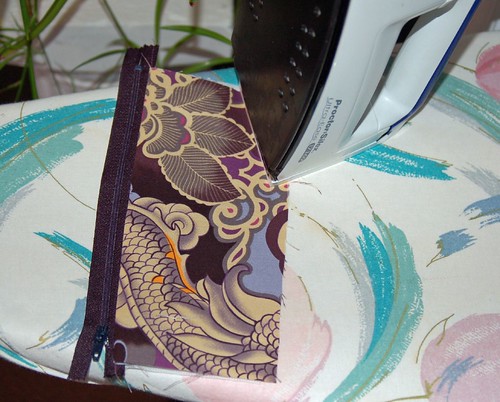
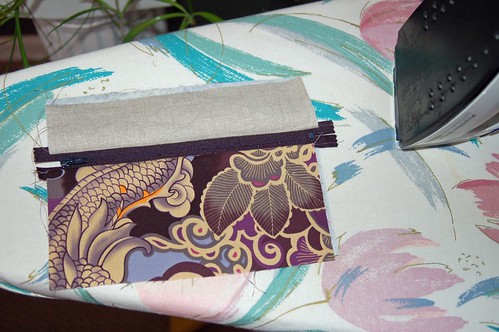
Step 6: Press.
After sewing across the piece, iron the piece so the fabrics on both sides lay flat against the zipper.
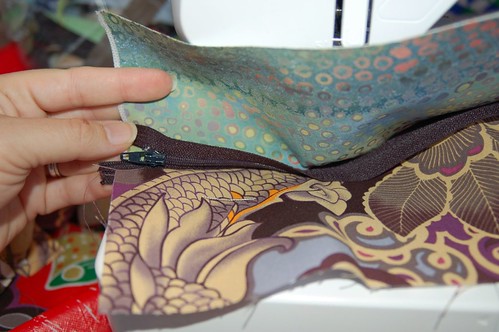
Step 7: Pin the top pieces to the zipper.
Again, make sure to put the right side of the zipper face to face with the right side of the outside accent fabric and the back of the zipper face to face with the right side of the lining fabric. Pin in place
Your zipper sandwich should look like this.
Open the zipper about halfway again so you can sew more easily and not have the zipper pull in the way.
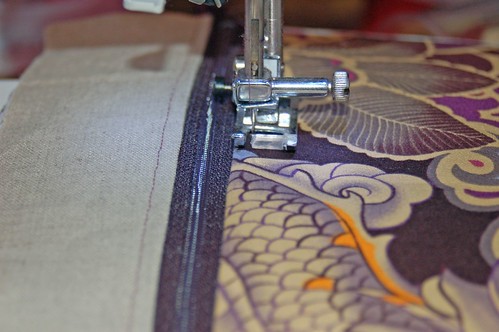
Step 8: Start to sew the zipper to the top fabrics using a zipper foot or a quarter inch seam allowance.
After sewing halfway across, make sure the needle is in the down position, raise the pressure foot, and close the zipper just as you did in step 5.
Step 9: Press.
Make sure both the top and bottom lay flat when the zipper is closed.
Step 10: Top stitch.
Sew across the top and bottom of your zipper using a quarter inch or an eight of an inch seam allowance.
Tip: It helps to use foot of your machine as a guide. Make sure to line up the foot to the edge of your fabric for a straight clean top stitch.
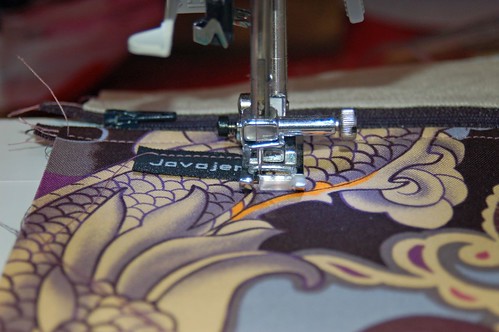
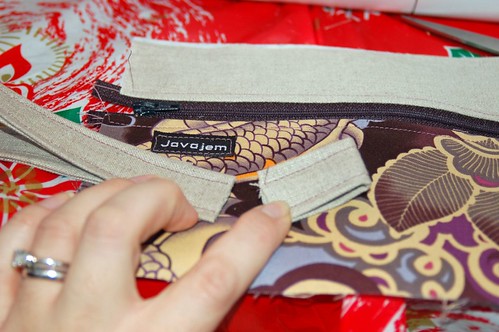
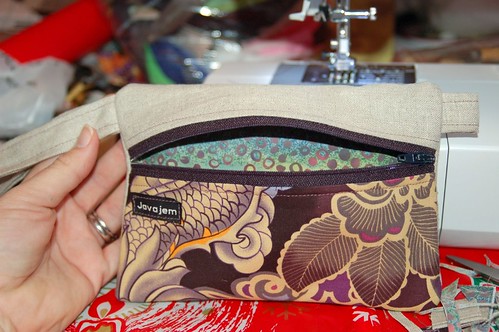
Step 11: Add your own label (if desired).
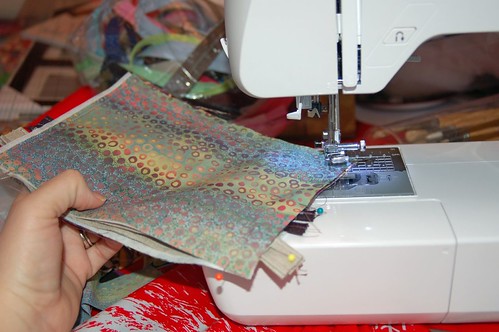
Now is the time to add any labels or logos you want to be on your wristlet. Sew around the edge (getting as close as possible to the edge while still catching the label) making sure to leave the needle down when turning the corners.
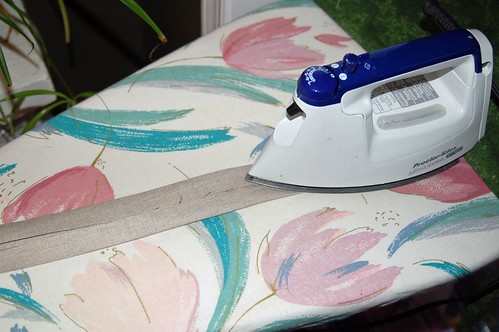
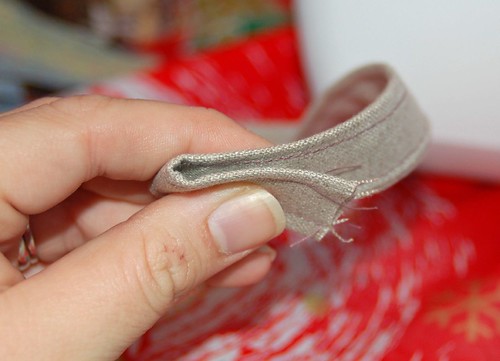
Step 12: Prepare the handle.
Fold your fabric in half legnthwise and press a middle seam. Then open the handle, and fold the two halfs into the middle seam and press again. Finally, fold the handle in half (after folding and ironing the outside edges into the middle) and press. This will create a sturdy and neat handle with all the raw edges folded into the inside.
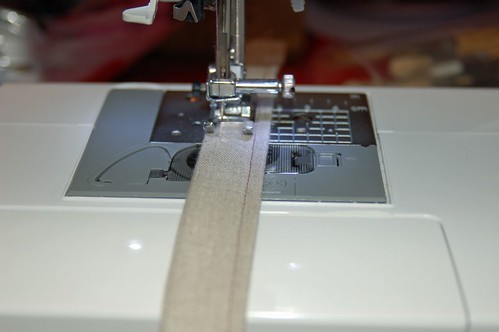
Step 13: Pin handle and sew two border seams.
Using your pressure foot as a guide, sew the legnth of the handle with a quarter inch or an eight of an inch seam allowance on both sides of the handle.
Step 14: Cut about a two inch piece from the end of your handle. This will act as a pull to assist in the opening and closing of the zipper.
You should now have two pieces - one long piece for the handle and one small piece for the pull:
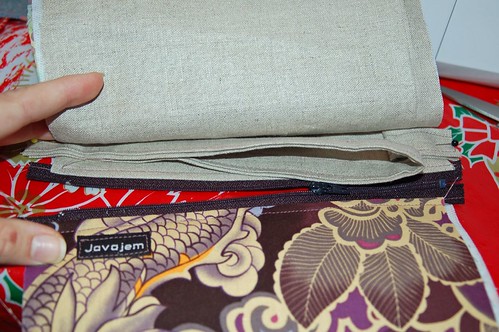
Step 15: Fold the handle and pull pieces in half and pin them to your fabric above the zipper.
Make sure the handle and pull are on the inside (you are about to make another fabric sandwich)
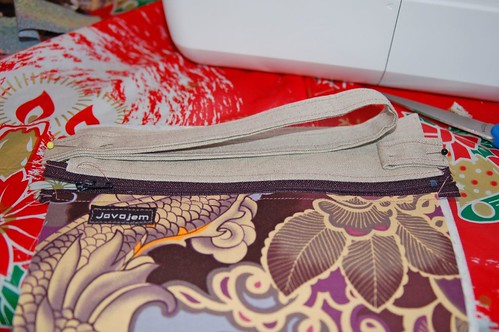
Step 16: Make the fabric sandwich.
Layer your pieces as follows:
- The bottom layer should be your fabric with the zipper - right side up.
- Next, add the linen right side down (or the piece of fabric that you want to be the back of the outside of your wristlet)
- The last layer is the lining fabric right side up.
Check to make sure your handle is in the inside of this sandwich.
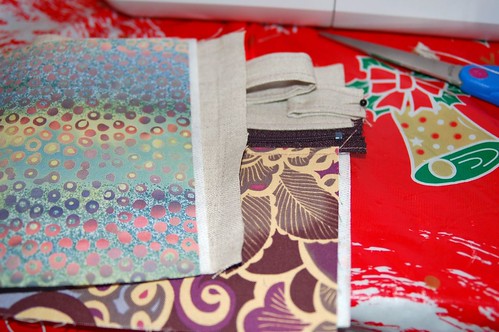
Step 17: Open the zipper - otherwise you will have a hard time opening the finished piece after you have sewn all the sides.
Step 18: Pin the pieces together.

Step 19: Sew all around the outside.
To reinforce the handle and the pull, sew backwards and forwards over them a few times for extra strength. Be careful when sewing over the zipper, and when sewing over the handle. The fabric is very thick! Go slowly!
Tip: For neat corners, remember to turn your work with the needle in the down position.
Tip: To make sure you don't accidentally sew through your handle, you can pull it through the zipper opening.

Step 20: Trim the corners.
When you are finished sewing, trim the excess fabric from the corners and the outside edges, being careful not to cut through your seams.

Step 21: Turn your wristlet right side out through the zipper.
Iron one more time to press out any bulk.
Step 22: Enjoy your new wristlet!
I hope you try to make one too - and definitely write and let me know if you make one. I'd love to see the finished product!
Have a great weekend!
** Updated**
Many people have asked where I got the labels. I got them from namemaker.com
94 comments:
So are you gonna sell these or what? ;)
They look great!
Awesome tutorial. You have now given me a reason to go fabric shopping. Woo hoo!
Jane
Adorable! I think I might just have to blow the dust off my sewing machine.
OOOOHHH that's why you do the tabby thingy. I'll make a couple this weekend with that. I thought these would be apropos for my SIL considering what she gave me for XMas
Thanks for the tutorial! I love the fabric you used for this one! I wish I would like to sew more...
Very cool! Love the koi fabric too.
I've been wondering how to do these!! Your Tutorial is the best, I now understand how to do zippers. I think I will go pick up a couple zippers tonight just to get to practice! I'm so excited.
great job!!! yet another project to add to my sewing list!!! (like I'll ever get to any of them without you guys around!!!)
Oh I love them. You are a groovy girl.
dawna
I love the fabric you used. Especially the one in the last pic.
That's a great tutorial, thank you so much for sharing!
Thanks for the tuto, it will help me to improve the wristlet I sew. you can have an example here:
http://pinky.over-blog.net/article-16925286.html
(sorry it's in French)
oooh.
i just finished a tote and this is now my new next project.
thanks for the detailed instructions.
Professional as usual girl and I love how the lining looks like fish scales. You shame us all you hussy.
Great tutorial!
thanks for sharing it :)
and i love your blog too..so many things to be inspired by!
*diane
Neat tutorial; I thought it was interesting and informative. :)
Such great photos. Very well done.
Thanks for the tutorial! I made my first wristlet today and I am hoping to make another one this weekend. With your help I sewed my first zipper successfully!
oh, thank you! i've been wanting to make a wee purse, but haven't found a fun enough pattern. you rock, sister!
Thanks for the tutorial! I made one and posted it on my blog:
http://turnandpress.typepad.com/turn_and_press/2008/03/my-wristlet-wit.html
I think it came out great!
Thank-you for the tutorial. I made one too.
http://www.flickr.com/photos/soja/2335272720/ Amanda
Thank you for this!! I am going to refer to it in a future post.
Ciao!!
Nancy
Hi, I just made my own today and it turned out so good! Thanks for the instructions!
www.gatofish.wordpress.com
-Laura
hello great tutorial , but i have a question..., what happens.. when you still see raw edges in the inside..
how should i do a french seam .. to hide this.. ?
Seriously! Your tutorial is amazing and so easy to follow. Believe me I am so bad at following a pattern :-)
This is so cute - as soon as I have a free moment I´ll try this.
Maybe I can finish some before christmas?!
JOYaum
I can't wait to try this!! Thanks for sharing!
There it is :)
http://joyaumcreative.wordpress.com/2008/11/20/ein-gelungener-versuch/
JOYaum
Nice tutorial! Very easy to follow, and they turned out wonderful!
http://bookwyrmknits.wordpress.com/
this is a great tutorial!!
Congrats!
Amazing easy tutorial! Thanks for taking the time to create wonderful instructions!
I posted some photo's on my blog: http://arianephillips.blogspot.com/2009/02/new-wristlet-tutorial.html
Thanks for the tutorial! I just finished my first wristlet today. =)
I posted about it here:
http://summernightsmiles.wordpress.com/2009/03/07/wristlet/
Thanks for such a wonderful tutorial! I made my wristlet with selvages and it turned out very nice thanks to your great zipper instructions! I posted about it here... http://hangingonbyaneedleandthread.blogspot.com/2009/03/zippers.html
hey... where did you get your awesome 'javajem' tags?
Wow! I think this design is going to be my first attempt at making a wristlet. You are so talented and inspiring! Show us more!
*J
Awesome tutorial!! I posted a link to it on Craft Gossip Sewing Blog: http://sewing.craftgossip.com/tutorial-sew-a-zippered-wristlet/2009/05/12/
--Anne
just finished mine, made it a little bigger. Great tut, out to shop, I need more zippers!!!
You've done a really neat, professional job!
Perfect tutorial, thanks
CUTE ! CUTE ! CUTE ! great tute, great pics. Do I really need another project ?
http://pipandpipper.blogspot.com
Thanks for the tute! Love your blog. Come visit mine.
Hugs...Yoonie
Thanks for the FANTASTIC tutorial!
I "finished" the inside raw edges by sewing a zig zag stitch around all the edges so they wouldn't fray.
Pics of finished wristlets here... http://www.flickr.com/photos/13263170@N07/3612731842/
Amazing tutorial!!! This wristlet is perfect. Thanks for sharing!!!
Lavi
Great tutorial! Here's the one I made:
http://awednesdayafternoon.blogspot.com/2009/06/wristlet-and-necklace.html
I can't wait to make more.
OLÁ
OBRIGADA PELO PAP DA BOLSINHA QUE AMEI.
PARABÉNS PELO TEU TRABALHO
BJS
AVÓ MARGARIDA
I really like this, but I'm not crazy about having all the seams visible on the inside. I am wondering if you can show us a way to make this with clean or French seams so they don't fray on the inside.
I was able to make several of these with clean-edged lining, instead of having the raw edges exposed on the inside. It's a little more time intensive and took some figuring out, but I love the result! Come take a look at what I've made!
trinacouncil.blogspot.com
This tutorial will be very much related to my field. Thanks for the posting and sharing your thoughts with us.
these are adorable. thanks for the tutorial. i absolutely love the fabric :) can you give me any tips on finding cute, low cost fabric or where you found yours? it's so pretty!
Thanks lilbluestar - I actually get alot of my fabrics at Joann's or online at stores like Reprodepot.
Dear Jody,
I love this!!!
Thank you very much!!!!
Kind Regards,
Carine
Wow, this was so easy and cute! I now have Christmas ideas for the 12 women in my family. To cover the raw edges on the inside of mine, I just trimmed the seam to 1/4" and Fray Checked them. Thanks so much for the inspiration!
Thank you!! I am really new to sewing ( I have only sewn three t-shirt bags) and I just made one of these without the wristlet part for a friend. It actually turned out pretty good. Thank you again.
Jennifer
Wow!... Would best describe how I felt after viewing your tutorial.
Great pictures and easy to follow instructions. You didn't miss a beat. Thanks...off to my fabric stash. Lynne
Lulu,
I love this tute I posted it on www.crafster.org.
Thanks!
Thanks for the tutorial. I received a new sewing machine as a Christmas gift and thought a wristlet would be a good first project. Your blog is such an inspiration!
Thanks for posting this tutorial! I had a great time making it. Here is a picture of mine:
http://sitasewing.blogspot.com/2010/01/wristlet-purse.html
I made your wristlet today. It is the first project I've made on my new sewing machine. Your tutorial was amazing! Thanks again. Here it is http://6ptstar.blogspot.com/
Thank you for this tutorial! I made one with a lap closure for my sister for Xmas! Wish I had remembered to tae a picture of it!
http://themaxwellscrafts.blogspot.com/
Dear Jody,
thank you so much for this great tutorial. I had a lot of fun making one for my dad!
Kind regards from Germany,
Ulrike
I got my sis to send a photo! Here is the wristlet with a lap closure. This matches a bag that I made her for her birthday last year.
http://lh4.ggpht.com/_tjnthNeaEsw/S3MepvbWQTI/AAAAAAAADdQ/cLAiFpPZgPU/s144/WristletG1209.jpg
Thank you!! One of the best tutorials I have ever followed! I even finally understood how to do a zipper!!! so now I'm no longer afraid of zippers, thank you!
feel free to visit www.lainesbabies.blogspot.com for the wristlet I made.
Hi! I fell in love with this last week and I finally got to do it today! Love it. I was really searching for a bag I could put across my chest...so instead of a wristlet I made a longer strap and sewed it to the top. I love it. Can't wait to make another. Maybe a wristlet! :)Thank you SO much!
Stacey
I really like this, thanks. Can you tell me where you got your labels?
The tutorial is very well done and easy to follow and the outside looks great... however, the lack of finished edges on the inside drives me nuts.
Awesome tutorial! Thank you for sharing ^_^
Awesome tutorial! Thank you for sharing ^_^
I was searching the internet for a cute wristlet tutorial and found your blog !!! I just now finished my first wristlet ... your tutorial is soooo plain and well written I am a very beginner at sewing and I had no trouble following your tutorial -- thank you for being so detailed !!! I made my wristlet out of old bluejeans -- bluejean material for the inside/outside I used the hem for the handle and pull tab and I took the zipper out of the jeans and used it too !! It's fun to recycle!! :)
Thanks again!
Jodi Beth
hey Jodi. look at the Wristlet I made from your tutorial!
http://gofashionz.blogspot.com/
the cloth is not new but old one.
Thanks for teaching me so neatly!
Thanks for the tutorial! I love the fabric you used for this one!
Hello,
I'm not very computer literate so this was the only way I could figure out how to send you a photo of my first wristlet. I first want to thank you for your tutorial; it was very generous of you to share it and to take the time to make it. I do have some feedback about it that I hope you don’t mind me sharing.
The cutting out instructions was a bit off for me. For the front you need one piece that is 8X2 and one in contrast fabric that is 8X4. You need one piece 8X6 for the back. I ended up with extra pieces by cutting all of them 8x6.
For me the strap was too long so I put a knot in it. Next time I'll make it smaller and maybe a bit narrower.
I love my new wristlet and again I thank you for your time, I hope you don’t mind feedback.
i tried to send a photo to your email address of the wristlet i made but it came back to me unable to deliver it. sorry i can't show you a photo of my wristlet.
tara
You are so good
Your fabric used for your wristlet is very pretty. For a small wristlet, sure looks like a lot of steps in sewing. My machine does not handle a zipper foot for sewing zippers. Could you reccommend to me a tutorial site for first time zipper installers done by hand? My sewing machine is very small and is a Kenmore.
I just wanted to thank you for this great tutorial! Over the past couple of months, I've made 3, my mother made 3, and my grandmother is asking for one too! They are so cute and I like them a lot better than a bulky purse hanging off my shoulders. Thanks again!
Tia
mtrand2(at)gmail(dot)com
Thanks for the tutorial, I link to it on my blog http://craft-connection.blogspot.com/2011/09/wristlet-free-tutorial.html
I love this! Question...when I look at the photo of the material pieces and then the description and sizes they look different. Can someone explain this to me...I want to make this for a Christmas gift... Thank you
Thank you so much for this tutorial! Of course I have misplaced my zipper foot, but it was easy enough to do without. I posted a few pictures on my blog at samaridesigns.com.
I just finished my first "wristlet"! What fun! It turned out super - really good and thorough instructions in the tutorial. Thanks for doing that. I will give it to my son's girlfriend for her birthday Saturday and make some more for Christmas! If I can figure out how, I will send you a picture.
wow! absolutely ADORABLE! thanks for sharing... cannot wait to start on mine....
Thank you for this! So easy to follow and super adorable. More tutorials, please! :)
I would also like to know where you got your tags. I am sewing up some items and would like to have tags similar to that. Thanks!
i would also like to know where you got the tags. I am sewing up some items and looking for tags similar to that. Thanks!
These are awesome! Thank you so much for the great tut! I will be giving it a try soon Ü
EL TUTORIAL ME PARECE MAGNIFICO, LO VOY A INTENTAR HACER. HE USADO UNA FOTO TUYA EN MI BLOG, SI NO TE PARECE BIEN DIMELO Y LA QUITO, HE MENCIONADO LA FUENTE DE LA FOTO
me parece un gran tutorial, voy a intentar hacerlo. He usado una foto tuya en mi blog si no te parece bien la quitaré. he mencionado la fuente.
un saludo
EL TUTORIAL ME PARECE MAGNIFICO, LO VOY A INTENTAR HACER. HE USADO UNA FOTO TUYA EN MI BLOG, SI NO TE PARECE BIEN DIMELO Y LA QUITO, HE MENCIONADO LA FUENTE DE LA FOTO
Great tutorial!!!
Thank you for this...
You have a new fan from Brasil!!
Me!
how can I show you a picture of my wristlet?
Love this. Thanks for sharing.
Thanks for the tutorial, these are great!
Hello - I came across your blog after finding an image of one of your bags on Pinterest while I was searching for some fresh ideas for my handbag website (no don't worry, not to copy :) )- I am glad I found your blog, you do great work - do you sell any of your finished work?
This is where I saw the image of your bag on Pinterest http://pinterest.com/chelmsford/handbags/
I have just started sewing again after many years and came across this cute wristlet while perusing Pinterest. I decided to try is as a stepping stone to more difficult bags and purses. Thanks for the tutorial. I had fun!
P.S. The only way I could figure to attach a photo was to post it to my FB cover page and provide the url.
https://www.facebook.com/nikki.zimmerman.96
Post a Comment