
I went over to my friends Tara and Tien’s. They invited me over for a day of marbling! Tien (Seng)’s sister Tien (Yi) and their mom were also there (and yes both siblings answer to Tien!)
When I got home last night - I did a bit of research on the history of paper marbling. I seem to have found some conflicting data. Some say the art originated in China... some say Turkey or Persia. Either way - it has been around a long time.
Here is one of the sites I found that details the history of how the technique may have started in China and then re-emerged in Japan...
History of marbling
Here is an excerpt...
"The art originated in China over 2000 years ago. It became popular in Japan in the 12th century under the name of suminagashi ("ink-floating"), first as a divination tool of Shinto priests, later as a decorative art. In the 15th century a similar art, called ebru (Turkish for "two-toned marbling") and now known as "Turkish marbling", developed in Turkey and Persia, but using a rather different technique. In Europe, marbled paper became popular in the 17th century, especially for book endpapers. At first a secret art exploited by few professional makers, it became a popular handicraft in the 19th century after the English maker Charles Woolnough published his The Art of Marbling."
We did marbling on both paper and fabric. I was amazed at how intricate the designs can be and how easily the results are acheived. The basic steps we used to marble the paper and fabric are:
1. We dissolved alum in water. This is sponged onto each paper to be marbled, and the paper is allowed to dry. The alum is what will bond the color to the paper.
2. A thick liquid, referred to as the size, is made by blending a type of gelatin (carrageenan) with water.
3. The size is poured into a shallow tray. (Tien built one just for our use)
4. Several colors of ink or paint are sprinkled onto the surface of the size. They float on the surface because they are lighter than the thickened water. (We used pieces of a broom tied together with zip ties as our sprinkling tools)
5. A stick is used to stir the floating colors if desired. Various combs and rakes may also be run through the colors to make more intricate patterns. (Tien made us some "combs" out of nails and spare pieces of wood)
6. A sheet of the alum-treated paper is gently laid onto the surface of the size, and it absorbs the floating colors. Only one print can be made.
7. The paper is lifted off, rinsed, and hung up to dry. Fabric marbling is done the same way, except for step #1: Instead of sponging the alum onto the cloth, it is soaked in the alum water, then hung up to dry, then ironed flat. After that, it can be marbled just like a sheet of paper. (*** Make sure every wrinkle is ironed out - we had one mishap where not all of the wrinkles were gone... the paint stuck to the wrinkle and ruined the pattern)
Here are some shots of the fun part – making the whirls of color appear…
Oh! ... before you view these pics - I must warn you not to be alarmed.
There is no nuclear attack pending...
We are wearing these fashionable white jumpsuits by choice!
They are not yet available in most boutiques - but if you must have one - you can probably find one at Home Depot or elsewhere online.
(In other words - no jokes about the jumpsuits!!)
Here are our marbling attempts:
First - we added the paint
Then raked the paint to form the sworls
Then the fabric is laid on the finished paint pattern
The fabric soaks up the paint almost immediately.
Then - when you pick up the fabric – the paint pattern stays intact.
Here’s my first attempt
Tien’s mom’s first attempt
Tien perfected the spiral technique
My second attempt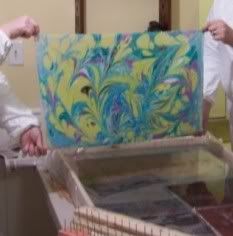
Next we did large sheets of fabric
Here's my large sheet
Tien even built (that morning!) a drying rack for our designs
Here’s a closeup of one of mine drying
Next it was on to paper marbling.
Here is Tien adding an alum mixture to the paper - to prepare it to hold the paint
I am adding paper cards, frames and a large sheet of watercolor paper to my mixture.
Here is the large sheet I did...
I have no idea what I will make with these yet - but I know it will be fabulous!
Oh - I almost forgot – we stopped at a yarn shop... Downtown Easton MD is so cute. Almost all the shops have dogs. The dog here was named Cinnamon and guarded the yarn quite well!
Tara bought both Tien Yi and I some gorgeous Fiesta yarn for out Christmas gift. I will post a pic soon!
Also - more on my first sweater next time!
5 comments:
That is SO cool!
that sounds like so much fun!!
What an interesting hobby. Everything looks wonderful. Can't wait to see what you create with the paper and material.
The colors are really really pretty. Did you get to keep the jumpsuit?
Gorgeous!
Post a Comment